Scraps in a Box or Sorted by Shape? Two Ways to Keep Paper for Making
Choose a paper-scrap storage method that fits your projects, so useful colors and shapes stay easy to spot without turning scraps into a chore.
You reach for the blue paper to finish a gift tag, then uncover a tangle of narrow strips, torn corners, and pieces too small to use. A simple paper-scrap storage choice can make the next project easier: keep everything together, or sort pieces by shape. The right answer depends less on having a tidy craft area than on what you like making.
Start with your projects
Before moving scraps into containers, think about the projects you return to. Cards and collages often call for color, texture, and unexpected combinations. Paper chains, woven designs, and repeated decorations benefit from pieces that already share a shape or width.
Choose a recent project as your guide. What did you search for: a particular color, a broad piece for a background, or a handful of similar strips? If you rarely remember, begin with one mixed container. If a project repeatedly needs prepared shapes, sorting may save you from cutting the same forms again.
Also notice what counts as useful in your hands. A sturdy rectangle might suit a small card, while a soft, feathered edge might be just right for a collage. You do not need a universal minimum size. Keep scraps you can imagine using, and let the rest go into paper recycling where accepted.
Choose a storage style
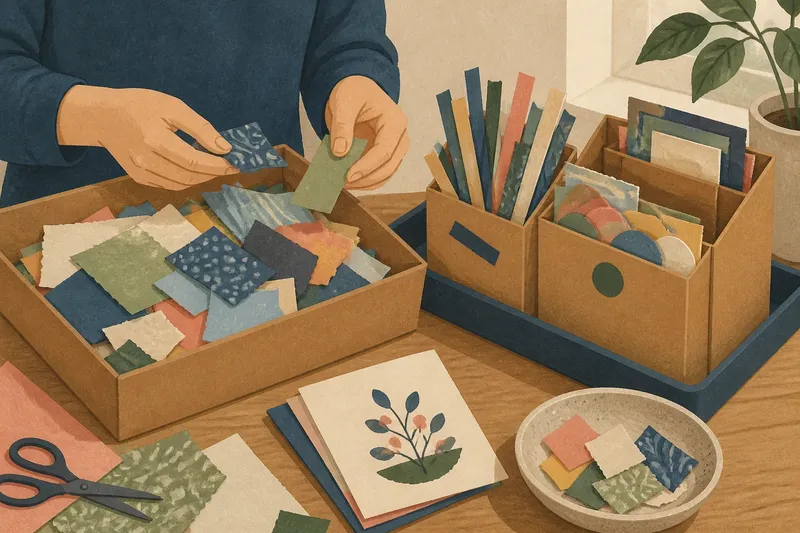
A mixed box is the forgiving option. Drop usable scraps into a shallow box or lidded paper tray, then browse by color and texture when an idea takes shape. This suits exploratory making, shared family supplies, and people who enjoy combining pieces on the fly.
Its drawback is searching. Small pieces can settle under larger sheets, and familiar colors may hide in the middle. A low, wide container makes browsing easier than a deep jar or narrow bin. If several kinds of paper go in, keep delicate tissue or glossy pieces from being crushed beneath heavier card by placing them in a simple paper envelope inside the box.
Shape sorting makes a different promise: less rummaging for a specific form. You might keep rectangles together, strips in another pocket, and circles or other cutouts in a third. This suits projects that use repeated shapes, as well as makers who like to prepare pieces during one session and use them later.
Sorting can become fussy if every variation gets its own home. A strip with a jagged edge does not need a special category unless you often use it that way. Keep the number of groups small enough that putting scraps away remains easier than leaving them on the table.
Make a small first sort
Clear a table and gather paper scraps from the places they have accumulated: a desk drawer, a folder, or beside the cutting mat. Work in daylight if possible, since thin paper can be hard to distinguish when colors overlap. Set out the container you are considering before sorting; its capacity is a useful reminder not to create more categories than you can maintain.
Make three temporary piles:
- Ready to use: clean pieces with enough area or an appealing edge for a project you actually make.
- Worth reshaping: pieces you would trim into a familiar shape or size during an upcoming project.
- Not useful to you: scraps that are damaged, awkward to store, or unlikely to leave the pile.
For the ready-to-use pile, try a quick shape check. If you often reach for a form such as strips or circles, gather only those pieces and see whether they make a meaningful group. Put everything else together. If the shape group looks thin or you cannot name a project for it, that is a good reason to keep a mixed box instead.
Pick a home and label
Put the storage where you make things, not where an ideal craft room might be. A shallow photo box can sit on a shelf near a desk; a paper folder can slide beside a sketchbook. Avoid squeezing scraps into a tight container, which can bend corners and make browsing awkward.
For a mixed collection, use one clear container or one folder with a few broad pockets for especially delicate or large pieces. For shape sorting, use paper envelopes, dividers, or small open trays. Label them with plain words such as “strips,” “circles,” and “rectangles,” rather than a detailed description that takes longer to read than the contents take to inspect.
Say you make layered greeting cards and often cut narrow strips from patterned paper. Keep those strips in one labeled envelope, with the remaining usable scraps in a mixed box. When you start a card, the prepared strips are visible at once, while unusual colors and textures remain available for spontaneous combinations.
Keep the system easy
After a making session, return only scraps that still seem useful. Do not spend time trimming every ragged edge in advance; cut a piece to fit when a project calls for it. If you find yourself repeatedly sorting the same scraps back and forth, simplify the categories or combine them.
Every so often, browse the collection while choosing your next project. A shape that no longer suits your habits can go back into the mixed box, and a new recurring project may justify a small category. Treat the arrangement as adjustable, not as a rule you have to defend.
What is not worth the effort? Sorting scraps by every color, paper finish, and tiny size before you know you will use those distinctions. A container that is easy to open and easy to put away usually serves a maker better than an elaborate filing system.
Which storage fits you?
Should I sort paper by color or shape?
Choose color if you usually begin with a palette for cards, collage, or decoration. Choose shape if your projects repeatedly use the same forms, such as strips or circles.
What container works for paper scraps?
A shallow box or folder makes a mixed collection easy to browse without hiding small pieces beneath a deep stack. For shape groups, envelopes or open trays keep categories visible and easy to return to.
How small should a paper scrap be to keep?
Keep a piece if you can name a use for its size, texture, or edge in the kinds of projects you enjoy. If it feels like something you are keeping only because it might someday be useful, recycling it can make room for scraps you reach for.
Let projects decide
There is no need to settle the question once and for all. Start with a mixed box if your projects vary, or set aside one shape group if a particular form keeps appearing in your work. Notice what you reach for over the next few making sessions, then adjust the paper-scrap storage to match. A good system is the one that lets you find a useful piece and get back to making.